OKD Homelab: Single Public IP, Full Cluster
TL;DR: This isn’t a step-by-step installation guide but a walkthrough-like of the homelab architecture I’m currently using and the decisions behind it. One physical server, one NIC, one public IP: an OpenShift 4.16 cluster running on Proxmox, with OVS bridging to multiplex IPs on a single port, pfSense as the internet gateway, and HAProxy for HTTP routing. I cover how I expose both web apps and TCP services (like databases) to the internet using MetalLB, cert-manager with Let’s Encrypt, and Cloudflare DNS. If you’re running a bare-metal cluster behind a single public IP, this should save you some debugging time.
⚠️ Note: This post does not cover the installation or configuration of Proxmox, pfSense networking/bridging, or OpenShift cluster setup.
Thanks to Aleskandro for the help with the setup and debugging.
The Challenge
When I started learning Kubernetes, everything seemed simple on a local machine with kind, minikube, or whatever similar tools. I understood how Services and NodePorts worked conceptually, but replicating a LoadBalancer service was a different story. There was no cloud provider to provision an external IP. Just my laptop and a Pending status that never resolved. It made me wonder: how do things actually work in the real world? What happens behind the scenes when you create a LoadBalancer in a cloud environment?
That question led me to build this lab. The goal: run a production-like OpenShift cluster that can serve both web applications and non-HTTP services (databases, message brokers) to the outside world, with proper TLS, DNS, and routing, all from a single physical server.
Hardware and Virtualization Layer
The entire lab runs on a single physical server using Proxmox VE as the hypervisor Proxmox was chosen for its KVM-based maturity, built-in ZFS support, and a web UI that makes VM management practical without being heavyweight.
The following virtual machines are involved in the setup:
| VM | Role | IP |
|---|---|---|
| pfSense | Firewall, DNS, VPN, NAT | WAN: public IP / LAN: 10.1.0.1 |
| HAProxy | HTTP reverse proxy | 10.1.0.x (static) |
| master0 | OpenShift control plane | 10.1.0.109 (static) |
| compute0 | OpenShift worker | 10.1.0.110 (static) |
| compute1 | OpenShift worker | 10.1.0.111 (static) |
All VMs communicate on the same internal network (10.1.0.0/24).
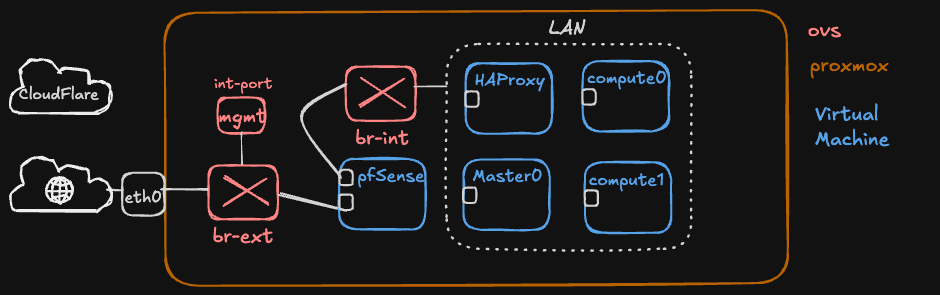
The Single NIC Problem and OVS
The server sits on a managed network where, by default, it receives a DHCP address that is only reachable from within the local network, not from the internet. A separate reserved public IP is available for external access. Both addresses need to coexist on the server’s single physical ethernet port.
This is where Open vSwitch (OVS) comes in. An OVS bridge configured in Proxmox can multiplex multiple network identities over a single physical interface. Through the bridge, different VMs bind to different IPs on the same port: Proxmox uses the internal DHCP address for its management dashboard, pfSense holds the reserved public IP for internet-facing traffic, and all internal VMs communicate on the 10.1.0.0/24 subnet, all through one ethernet cable.
A standard Linux bridge could handle basic switching, but OVS provides cleaner separation between internal and external traffic, VLAN support, and the ability to mirror or inspect traffic when debugging network issues.
Reference: Proxmox OVS Bridge Documentation
The Single Public IP Problem
With OVS handling the physical layer, pfSense now owns the public IP. But that’s still a single entry point for all internet traffic. Every service, whether it’s a web app on port 443 or a PostgreSQL database on port 5432, must enter through the same address.
Everything else, i.e. HAProxy, the OpenShift nodes, the databases, lives behind pfSense on private addresses. The question becomes: how do you route the right traffic to the right service when there’s only one door in?
The solution is layered:
                         Internet
                            │
                     ┌──────▼──────┐
                     │   pfSense   │
                     │  (Public IP)│
                     └──────┬──────┘
                            │
               ┌────────────┼────────────┐
               │            │            │
          NAT :80/:443   NAT :5432    NAT :other
               │            │            │
            HAProxy    MetalLB VIP   MetalLB VIP
               │       10.1.0.200    10.1.0.201
               │            │            │
          OCP Router    Database      Other TCP
               │            │          Services
          ┌────┴────┐       │
        app1  app2  app3    │
        (Routes)         (Pods)
pfSense acts as the gatekeeper. It performs NAT (Network Address Translation), forwarding incoming traffic on specific ports to the appropriate internal services. This is configured through port forwarding rules in pfSense’s firewall.
The key insight is that HTTP and non-HTTP traffic require fundamentally different approaches:
- HTTP/HTTPS (ports 80/443): Can be multiplexed. HAProxy reads the
Hostheader and routes to different backends on the same port. Ten web apps can share ports 80 and 443. - TCP (databases, MQTT, etc.): Cannot be multiplexed. Each service needs its own unique port. One port equals one service.
Reference: pfSense NAT Port Forward Documentation
pfSense: The Network Core
pfSense is doing a lot of heavy lifting in this setup, serving as:
- Firewall: controls what traffic enters and leaves the network
- NAT gateway: maps public IP ports to internal services
- DNS resolver: provides internal DNS for all VMs (e.g.,
master0.lab.local → 10.1.0.109) - DHCP server: manages IP assignments on the
10.1.0.0/24subnet (range10.1.0.10 - 10.1.0.100) - VPN server: allows remote access to the internal network
The VPN capability is particularly relevant to me. Since all the VMs have internal IPs only, VPN access through pfSense is the only way to manage the cluster remotely, whether that’s SSH to nodes, accessing the OpenShift web console, or connecting to internal services.
NAT Rules
The NAT configuration in pfSense is minimal by design:
| WAN Port | Destination | Purpose |
|---|---|---|
| 80 | HAProxy | HTTP traffic |
| 443 | HAProxy | HTTPS traffic |
| 5432 | 10.1.0.200 (MetalLB VIP) | TimescaleDB |
Each new TCP service that needs internet exposure requires one additional NAT rule. This is intentional. It acts as a deliberate security gate. Not every internal service should be internet-facing, and requiring a manual pfSense rule ensures someone has made a conscious decision to expose it.
Reference: pfSense Documentation
HAProxy: HTTP Traffic Routing
HAProxy sits between pfSense and the OpenShift router, handling all HTTP/HTTPS traffic. Its job is simple: receive connections on ports 80 and 443, and forward them to the OpenShift router pods on the worker nodes.
The OpenShift router (based on HAProxy itself, ironically)
then uses the Host header to determine which Route resource matches and forwards traffic to the correct application pod.
This two-tier proxy setup might seem redundant, but it serves a purpose: the external HAProxy handles the pfSense-to-cluster boundary, while the OpenShift router handles in-cluster routing with all the OpenShift-native features (route annotations, TLS termination, path-based routing).
For non-HTTP TCP services, HAProxy can also be configured in mode tcp to forward raw TCP streams.
However, with MetalLB in place, this is no longer necessary. TCP services get their own dedicated IP and bypass HAProxy entirely.
Reference: HAProxy Documentation
OpenShift 4.16 on OKD
The cluster runs OKD (the community distribution of OpenShift) version 4.16, with a single control plane node and two worker nodes. This is a minimal but functional topology for a lab. Production clusters would typically have three control plane nodes for etcd quorum.
OKD was chosen over vanilla Kubernetes for its opinionated platform features: integrated image registry, built-in monitoring stack, the Route resource for HTTP ingress, and OperatorHub for lifecycle management of cluster add-ons.
The Route Resource
OpenShift’s Route is the primary mechanism for exposing HTTP services. Unlike Kubernetes Ingress, Routes are a first-class OpenShift concept with native TLS termination, wildcard support, and integration with the cluster’s built-in router.
A typical Route looks like:
apiVersion: route.openshift.io/v1
kind: Route
metadata:
  name: my-app
  annotations:
    cert-manager.io/issuer-kind: ClusterIssuer
    cert-manager.io/issuer-name: letsencrypt-prod
spec:
  host: my-app.mydomain.com
  tls:
    termination: edge
    insecureEdgeTerminationPolicy: Redirect
  to:
    kind: Service
    name: my-app
  port:
    targetPort: http
Reference: OKD Documentation
MetalLB: Load Balancing for Bare Metal
This is where it gets interesting. In cloud environments,
creating a Kubernetes Service of type: LoadBalancer automatically provisions a cloud load balancer with a public IP.
On bare metal, that request just sits in Pending forever because there’s nothing to fulfil it.
MetalLB solves this. It’s a load balancer implementation for bare metal Kubernetes clusters that assigns real, routable IPs to LoadBalancer services from a configured pool.
How It Works
MetalLB runs in L2 mode in this setup (as opposed to BGP mode). In L2 mode, MetalLB responds to ARP requests for the virtual IPs it manages. When a LoadBalancer service is created, MetalLB picks an IP from the pool and one of the speaker pods begins answering ARP queries for that IP. Traffic arrives at the node running that speaker, and kube-proxy routes it to the correct pod.
Installation on OpenShift
MetalLB is available as an operator from OperatorHub. After installing the operator, three resources need to be created:
# 1. MetalLB instance
apiVersion: metallb.io/v1beta1
kind: MetalLB
metadata:
  name: metallb
  namespace: metallb-system

---
# 2. IP address pool (must not overlap with DHCP range)
apiVersion: metallb.io/v1beta1
kind: IPAddressPool
metadata:
  name: lab-pool
  namespace: metallb-system
spec:
  addresses:
    - 10.1.0.200-10.1.0.230

---
# 3. L2 advertisement
apiVersion: metallb.io/v1beta1
kind: L2Advertisement
metadata:
  name: lab-l2adv
  namespace: metallb-system
spec:
  ipAddressPools:
    - lab-pool
The IP pool (10.1.0.200-10.1.0.230) was deliberately placed above the DHCP range (10.1.0.10-100) and the static node IPs (10.1.0.109-111) to avoid conflicts.
The 31 available addresses should be more than enough for a lab.
Using It
Once MetalLB is running, exposing a TCP service is a single manifest:
apiVersion: v1
kind: Service
metadata:
  name: database-service
  namespace: app-namespace
spec:
  type: LoadBalancer
  selector:
    app: my-database
  ports:
    - protocol: TCP
      port: 5432
      targetPort: 5432
MetalLB automatically assigns an IP (e.g., 10.1.0.200), and the service is immediately reachable at 10.1.0.200:5432 from anywhere on the internal network.
To make it internet-accessible, a single pfSense NAT rule forwards port 5432 from the public IP to 10.1.0.200.
A Note on the Installation
During the MetalLB installation, the controller and speaker pods can be stuck in ContainerCreating for several reasone
In my case, the root cause turned out to be a stale leader lease in the OpenShift service-ca operator , i.e., the component responsible for generating
TLS serving certificates for internal services.
If the lease is stale, i.e. need to be renewed as in my case, it had stopped processing certificate requests cluster-wide.
The fix was to delete the stale lease and restart the service-ca pods:
oc delete lease service-ca-controller-lock -n openshift-service-ca
oc delete pods -n openshift-service-ca --all
After that, the service-ca operator acquired a new lease, generated the missing TLS secrets for MetalLB, and the pods started normally. This is worth mentioning because a dead service-ca operator can silently break many things beyond MetalLB (any operator or service that relies on auto-generated serving certificates will fail)
Reference: MetalLB Documentation | MetalLB Operator for OpenShift
cert-manager: Automated TLS with Let’s Encrypt
With HTTP services exposed via Routes, the next challenge is TLS.
The OpenShift router has a default wildcard certificate for its internal domain (e.g. *.apps.mylab.lab),
but external access uses a different domain (*.apps.mycustomdomain.com).
Browsers correctly reject the mismatched certificate.
The solution is cert-manager with Let’s Encrypt, using Cloudflare DNS-01 challenges for domain validation.
Why DNS-01?
Let’s Encrypt supports two challenge types:
- HTTP-01: Let’s Encrypt makes an HTTP request to your domain to verify ownership. Requires port 80 to be open and routable.
- DNS-01: Let’s Encrypt checks for a specific TXT record in your DNS. No inbound traffic required.
DNS-01 was the right choice because it works regardless of the proxy setup, supports wildcard certificates, and integrates cleanly with Cloudflare’s API.
Setup
The cert-manager operator is installed from OperatorHub. After creating the CertManager operand instance, three components are needed:
1. Cloudflare API Token (stored as a Kubernetes secret):
oc create secret generic cloudflare-api-token \
  -n cert-manager \
  --from-literal=api-token=<YOUR_TOKEN>
2. ClusterIssuer: configures Let’s Encrypt with Cloudflare as the DNS solver:
apiVersion: cert-manager.io/v1
kind: ClusterIssuer
metadata:
  name: letsencrypt-prod
spec:
  acme:
    server: https://acme-v02.api.letsencrypt.org/directory
    email: your-email@example.com
    privateKeySecretRef:
      name: letsencrypt-prod-account-key
    solvers:
      - dns01:
          cloudflare:
            apiTokenSecretRef:
              name: cloudflare-api-token
              key: api-token
        selector:
          dnsZones:
            - mycustomdomain.com
3. OpenShift Routes integration: a small controller that watches for annotated Routes and manages certificates for them:
oc apply -f <(helm template openshift-routes -n cert-manager \
  oci://ghcr.io/cert-manager/charts/openshift-routes \
  --set omitHelmLabels=true)
With this in place, any Route with the following annotations automatically gets a Let’s Encrypt certificate:
annotations:
  cert-manager.io/issuer-kind: ClusterIssuer
  cert-manager.io/issuer-name: letsencrypt-prod
The certificate lifecycle (request, validation, issuance, renewal) is fully automated.
Cloudflare SSL/TLS Considerations
One gotcha: Cloudflare’s free Universal SSL certificate only covers one level of subdomain depth (*.mycustomdomain.com).
Multi-level subdomains like example.apps.mycustomdomain.com are not covered.
If you’re using Cloudflare proxy (orange cloud), the browser sees Cloudflare’s edge certificate first, and if it doesn’t match,
the connection fails before traffic even reaches your origin.
The solution is to use DNS-only mode (grey cloud) for these deep subdomains, letting the browser connect directly to your origin where the valid Let’s Encrypt certificate is served. Alternatively, Cloudflare’s Advanced Certificate Manager covers multi-level subdomains.
Reference: cert-manager Documentation | Let’s Encrypt | cert-manager OpenShift Routes
DNS Architecture
DNS operates at two layers in this setup:
External DNS (Cloudflare)
Cloudflare manages the public mycustomdomain.com domain.
A wildcard record (*.mycustomdomain.com) points to the pfSense public IP.
For subdomains deeper than one level (like *.apps.mycustomdomain.com), DNS-only mode is used so that Let’s Encrypt certificates from the origin are served directly.
Internal DNS (pfSense)
pfSense’s DNS Resolver handles internal name resolution, allowing VPN clients and internal VMs to reach services by name without routing through the public IP.
The important thing to remember: DNS only resolves names to IPs, it doesn’t know about ports.
This is why HTTP multiplexing via the Host header is so valuable (it lets many services share a single IP and port pair).
TCP services don’t have this luxury and each requires a unique port.
Putting It All Together
Here’s the complete decision flow for exposing a new service:
HTTP Service
- Deploy the application in OpenShift
- Create a Service (
type: ClusterIP) - Create a Route with cert-manager annotations
- cert-manager requests and injects a Let’s Encrypt certificate automatically
- Traffic flows:
Internet → pfSense:443 → HAProxy → OCP Router → Pod
TCP Service
- Deploy the application in OpenShift
- Create a Service (
type: LoadBalancer) - MetalLB assigns a VIP from the pool automatically
- Create a pfSense NAT rule for the desired port → MetalLB VIP
- Traffic flows:
Internet → pfSense:port → MetalLB VIP → Pod
The only manual step for TCP services is the pfSense NAT rule, which is an intentional security decision (every internet-facing port should be a deliberate choice).
Lessons Learned
Check your service-ca operator. A stale leader lease can silently break certificate generation cluster-wide. Monitor the lease renewal time periodically.
Understand Cloudflare’s SSL depth limits. Free Universal SSL covers
*.domain.combut not*.subdomain.domain.com. Plan your hostname scheme accordingly or budget for Advanced Certificate Manager.MetalLB L2 mode is simple and sufficient for homelabs. BGP mode offers more features but adds complexity that isn’t justified in a single-network lab.
One public IP is not a limitation, it’s an architecture. With proper NAT, reverse proxying, and service mesh tooling, a single IP can serve dozens of services. The constraint forces clean thinking about traffic flow and security boundaries.